Grab a Picture
-- -- -- -- -- -- -- -- -- --
-- -- -- -- -- --
The Atomic Guide to Basic
Gimp Stuff
First, Find a Picture
Yep -- You're going to need
something to start with. I'll deal with getting your own work
into the computer in the Scanning
Stuff section later (unless you want to start there).
To keep things simple, let's focus strictly on working with:
Now that you have the idea, let's use the 23 Jan 2007 strip from Wapsi Square as the example. You can see it here:
Thanks to Paul Taylor of Wapsi Square for permission to use his work in this tutorial.
To keep things simple, let's focus strictly on working with:
1. Line art
2. Black and white line art (grayscale is OK)
3. Somebody else's art
4. Somebody else's art you find and download from off the web!
2. Black and white line art (grayscale is OK)
3. Somebody else's art
4. Somebody else's art you find and download from off the web!
Now that you have the idea, let's use the 23 Jan 2007 strip from Wapsi Square as the example. You can see it here:
Thanks to Paul Taylor of Wapsi Square for permission to use his work in this tutorial.
Next, Grab the Picture
To capture the image, do the
following: (you computer whizzes
can skip ahead if you want)
1. Put the cursor
over the image you want (the
pretty one in
the middle with all the people in it, ok?)
2. Right Click (Windows)
3. Select "Save Image as..."
4. Keep the same name (20070123_becauseofyou.gif in this case)
5. Put it somewhere you can find it again. (duh!)
2. Right Click (Windows)
3. Select "Save Image as..."
4. Keep the same name (20070123_becauseofyou.gif in this case)
5. Put it somewhere you can find it again. (duh!)
Got It! Now What?
Depending on how organized you
are, you may have already made a copy and moved the original to a
storage folder somewhere other than your art working folder.
Good for you! If you haven't, that was a hint.
You're art collection is going to be growing, so you will
keep coming back to whatever folder you keep your art stuff in.
One of the nuisance items with GIMP is that when you first
start it, it doesn't
remember the last folder used -- it will default to it's own
installation path. So, I recommend your art working folder be
under as few layers as possible to keep things handy. I keep
a D:\GIMPwork folder just for this reason -- It's only two clicks away.
The other GIMP shortcut is to have your work folder open on the desktop. Do a Drag-and-Drop with the file from the folder to the top of the GIMP control panel, and GIMP will open that image, and remember the path as well. I tend to do this because it's simpler. (That doesn't mean you shouldn't have your file system organized, though!)
The other GIMP shortcut is to have your work folder open on the desktop. Do a Drag-and-Drop with the file from the folder to the top of the GIMP control panel, and GIMP will open that image, and remember the path as well. I tend to do this because it's simpler. (That doesn't mean you shouldn't have your file system organized, though!)
Alright Already!
Can We Get Started Now?
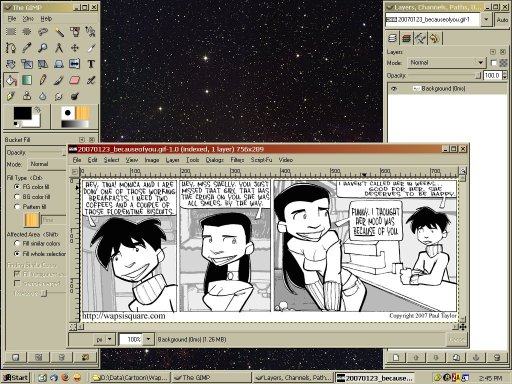
Yep. Fire up The
GIMP, load your image (20070123_becauseofyou.gif,
right?) and follow along! It should look
something like this: (Click Image
to see larger)
1. The original file is set for grayscale, but you want to use colors (I hope), so you have to change to RGB mode. Select Image, Mode, RGB, and click!

2. You started with an .gif Image file, and now you need to create a GIMP Workspace file -- a .xcf file. File, Save As, and change the extention to "xcf".
The filename should be 20070123_becauseofyou.xcf or MyFirstGinormousArtProject.xcf or whatever.xcf. Just make sure you have .XCF on the end, OK??
Things will look like this: (Click Image to see larger)

Nope -- Not a whole lot changed there other than the file name. But that's OK, because now it's time for:

1. The original file is set for grayscale, but you want to use colors (I hope), so you have to change to RGB mode. Select Image, Mode, RGB, and click!
2. You started with an .gif Image file, and now you need to create a GIMP Workspace file -- a .xcf file. File, Save As, and change the extention to "xcf".
The filename should be 20070123_becauseofyou.xcf or MyFirstGinormousArtProject.xcf or whatever.xcf. Just make sure you have .XCF on the end, OK??
Things will look like this: (Click Image to see larger)

Nope -- Not a whole lot changed there other than the file name. But that's OK, because now it's time for:
The Next Step -->
Making an Ink Layer!