Coloring
-- -- -- -- -- -- -- -- -- --
-- -- -- -- -- --
The Atomic Guide to Basic
Gimp Stuff
Now it's time you get to put the pretty colors on the picture! But first, a quick recap:
1. You have an original image on it's own layer
2. You have a white background at the bottom of the stack
3. You have separated the blacks and grays onto their own layer (called Ink Layer)
4. The Ink Layer is transparent where it's not black or gray
That last bit is the important bit. The blacks are opaque, but the grays are selectively transparent according to how dark or pale they are. This means you can see through them to the layer(s) and color(s) below! This is part of what makes an Ink Layer so useful for coloring.
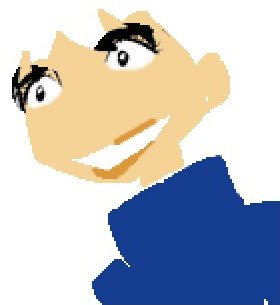
If you just wanted to dump colors into the white areas, it would be easy to select and paint-bucket fill those areas. But -- you run into problems along the line edges where they transition from white to gray to black. This makes things messy looking and tough to fix later if you want to try some other color. You wind up with something like this:

Instead of that, you're going to get to put colors on their own layer, as many as you want, while leaving the Ink Layer completely alone! Remember -- it's mostly transparent now, so you get to look through it to you new, pretty color combinations.
Great! Let's Get
Started!
And about time, too.
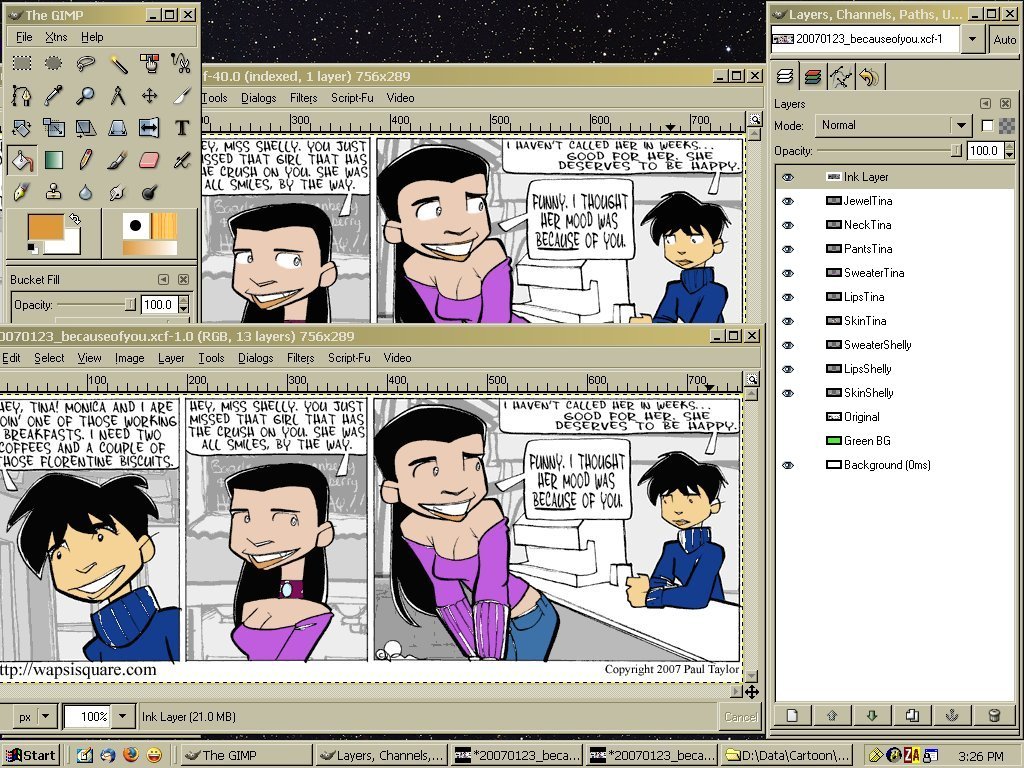
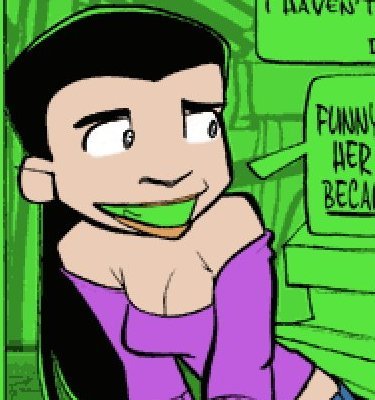
Here's a
colored strip by Wapsi fanboy Hewolf. Note that he
used something
better
than bucket fills for his coloring project.
Thank
you,
Hewolf, for permission to use your
example in this tutorial.

I liked his color scheme so much, I wanted to use it to make my own fan art with shading as well. The shading part will come later. Coloring first.
I liked his color scheme so much, I wanted to use it to make my own fan art with shading as well. The shading part will come later. Coloring first.
I Said, Let's Get Started!
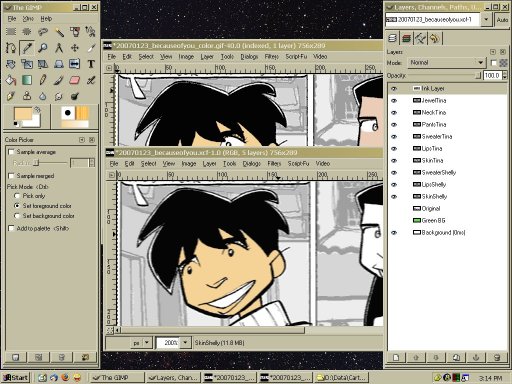
OK -- My first step is to make
a new layer called Green just above the Background, and fill it with a
really icky color of green. With the original layer off and
Ink Layer on, it looks like this: (Click image for larger)
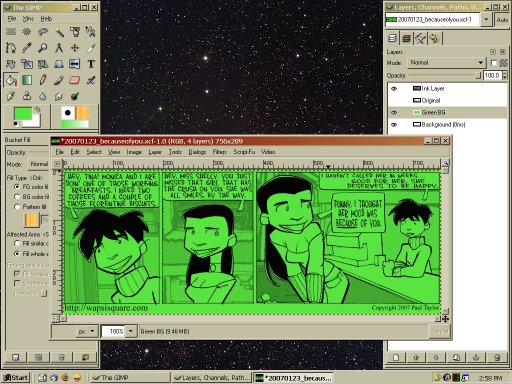 The green layer is above the white layer, so you don't see any white.
The Ink Layer is transparent (where not black, etc), so you
see the green through it. The Original is turned off -- check
the little eyeballs.
The green layer is above the white layer, so you don't see any white.
The Ink Layer is transparent (where not black, etc), so you
see the green through it. The Original is turned off -- check
the little eyeballs.
Note that you can pick your really icky color of green by clicking on the black/white color box (the left one for example) and choosing colors off the palette tool. (Much more on that later) I do this now to help sort out color problems later. You can turn it off for now by clicking on the eyeball. (Get used to it -- you'll be switching layers on and off a lot.)
Oh -- and what if your next project has lots of green in it? Then pick some hideous shade of red. But that's not important right now. On we go....
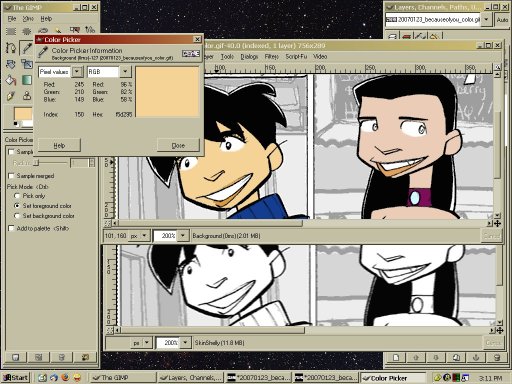
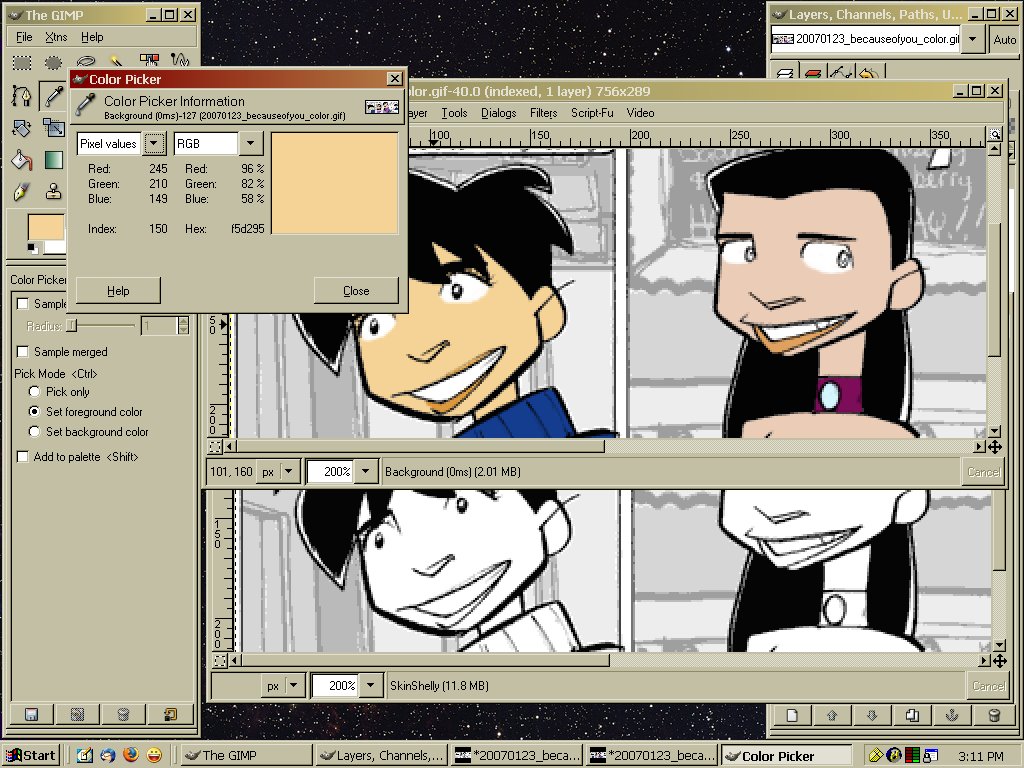
Grab the Color(s)
The eyedropper tool lets you pick
colors off an image and use them with any of the paint tools.
I put Hewolf's image toward the top and my working .XCF file
below. (GIMP lets
you have many images open at the same time.)
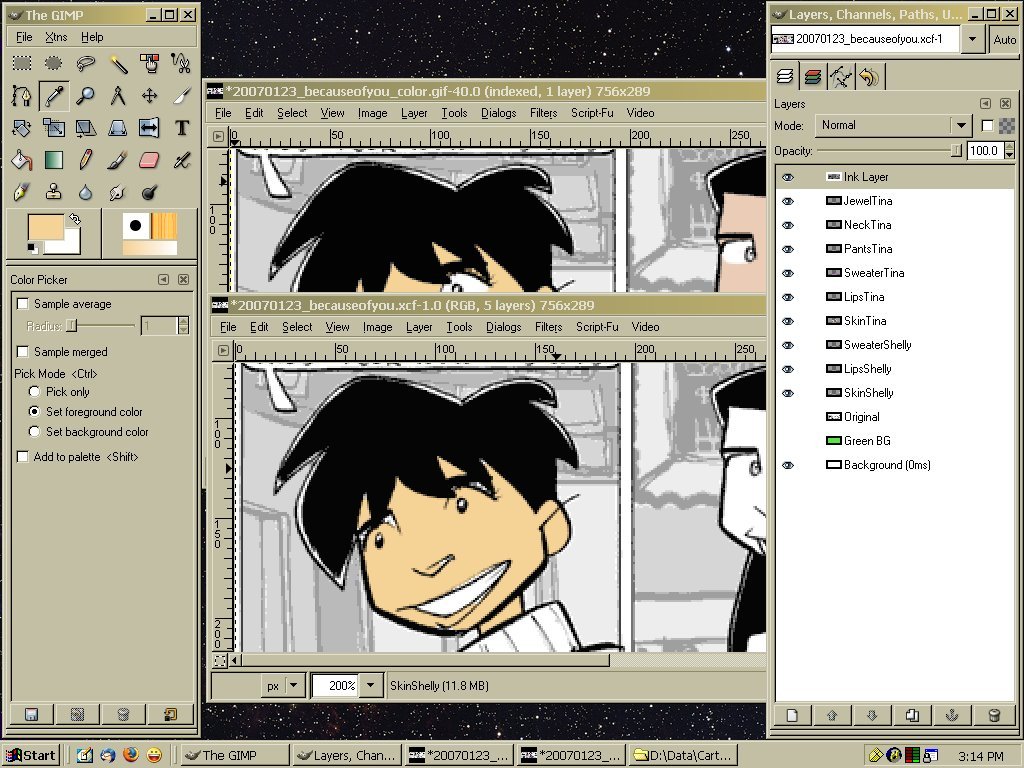
I clicked on the eyedropper, then on Shelly's face to select
the color. It looked like this: (Click image for larger)
Next: Skin Layer and Selection
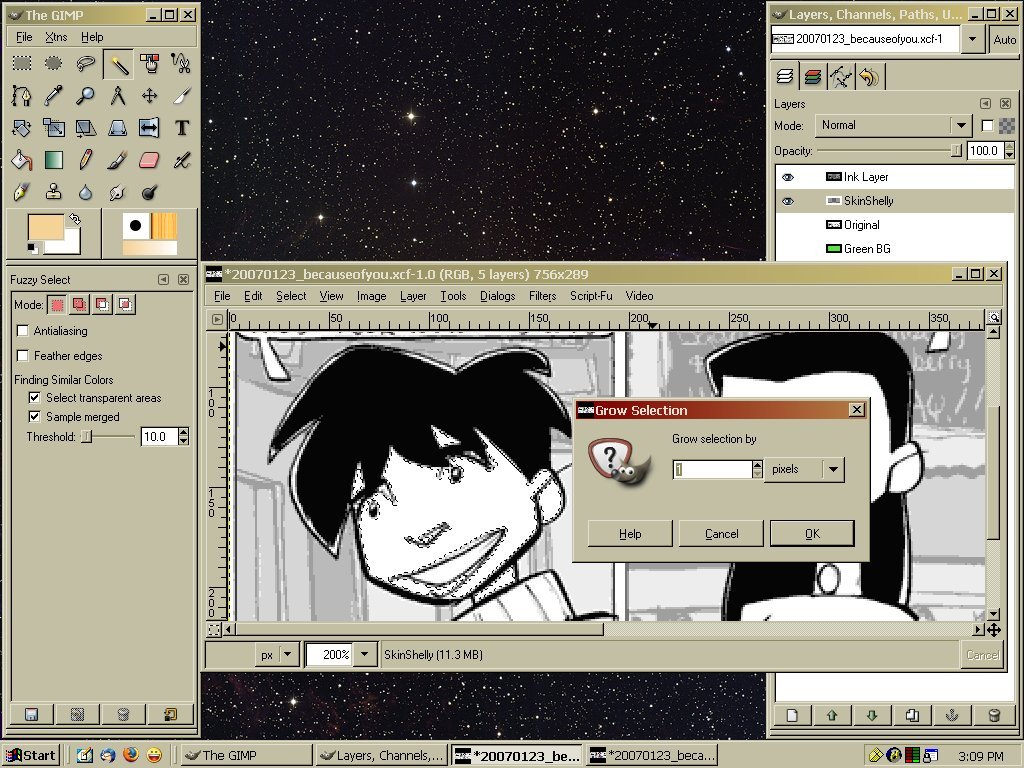
Make a new layer called Skin Shelly
to hold the color, and make sure it's active (gray). Click on
your working .XCF file window, then select the Magic Wand tool for
selecting things! Make sure the Selection Menu has check
marks
in the boxes for Select Transparent Areas and Sample Merged.
- If Sample Merged is turned off, only items on the active layer can be selected.
- Sample Merged on means you can select anything visible in the image.
- You can't select things on turned-off layers.
Click the Magic Wand anywhere in the white part of Shelly's face. You'll see a dotted line outlining the selected area. Note that it doesn't quite go exactly right up next to the lines. You can set the Threshold value on the Select menu (I use 10 -- higher numbers get you closer) but you start running into problems fast. Instead, got to the menu, Select, Grow Selection, and set for 1 Pixel. This will expand the edges by 1 Pixel and take care of most of the problem. It looks like this: (Click image for -- aw, you should know by now)
Color Fill
You have a specific layer for the
color, you have the area selected to color, and now you can use the
Paint Bucket tool to Fill the area with the skin color! Then
turn the Selection Off with Select, None, and
then you'll see this: (Click,
etc.)
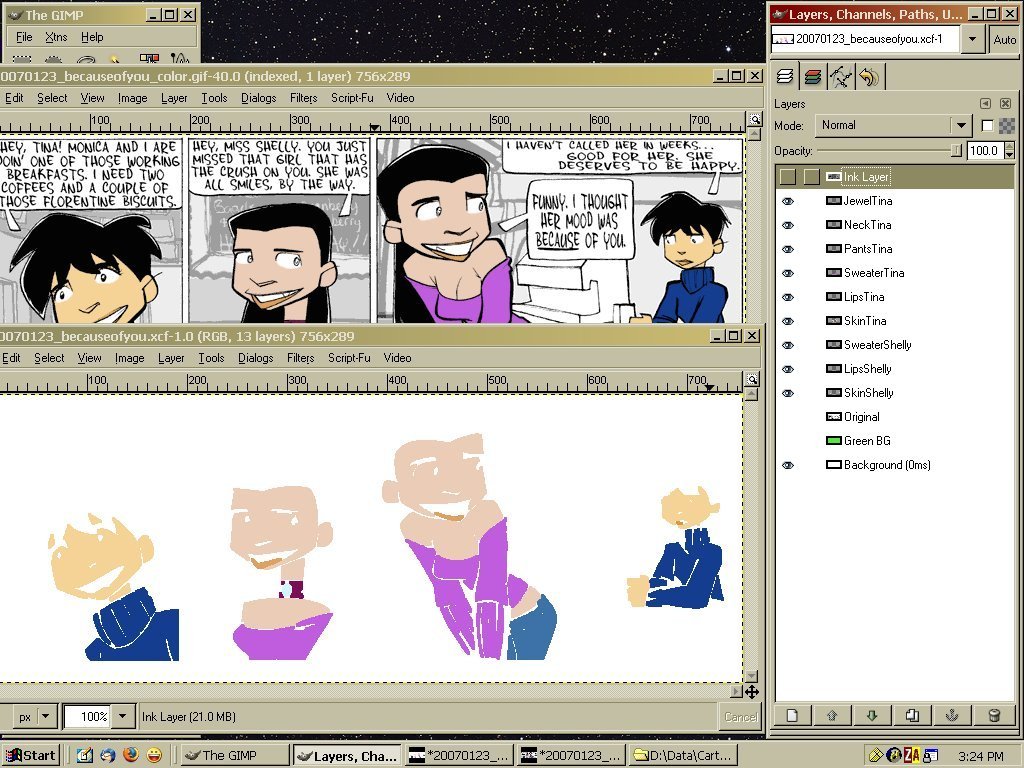
 Note here I've added empty layers for skin, sweater, pants, lips, for
both characters, and for Tina's neck band and jewel. You can
save time by selecting several areas at once by holding the Shift key
down while selecting -- you'll see a little + appear next to the wand
icon. You can do this manually with the Mode buttons on the
Select menu as well. The Control key lets you remove areas
you selected but don't want. A minus symbol ( - ) appear next
to the wand icon.
Note here I've added empty layers for skin, sweater, pants, lips, for
both characters, and for Tina's neck band and jewel. You can
save time by selecting several areas at once by holding the Shift key
down while selecting -- you'll see a little + appear next to the wand
icon. You can do this manually with the Mode buttons on the
Select menu as well. The Control key lets you remove areas
you selected but don't want. A minus symbol ( - ) appear next
to the wand icon.
When you're done (you are saving frequently, aren't you?) things will look about like this:
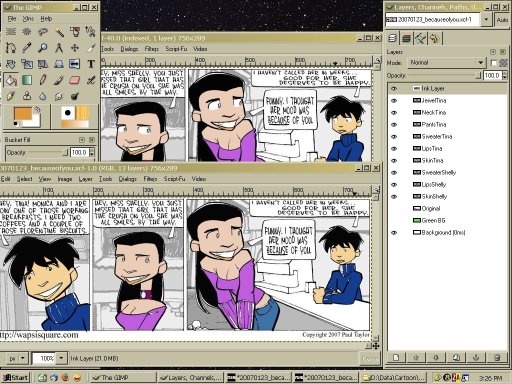 Hewolf (top) colored
the eyes on their own where my color fill spread through them.
There was no "edge" to keep out the fill. Note the
gaps in the sweaters where the fill didn't get in between the lines.
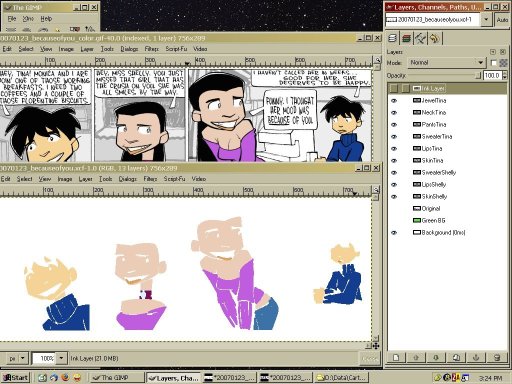
Time to fix things. Turn off the Ink Layer and take
a look.
All are you seeing is the color fills you've made and the
white
background. Note the Original and Green layers are still
turned
off. (Click to nibble on chocolate
bunny
ears)
Hewolf (top) colored
the eyes on their own where my color fill spread through them.
There was no "edge" to keep out the fill. Note the
gaps in the sweaters where the fill didn't get in between the lines.
Time to fix things. Turn off the Ink Layer and take
a look.
All are you seeing is the color fills you've made and the
white
background. Note the Original and Green layers are still
turned
off. (Click to nibble on chocolate
bunny
ears)
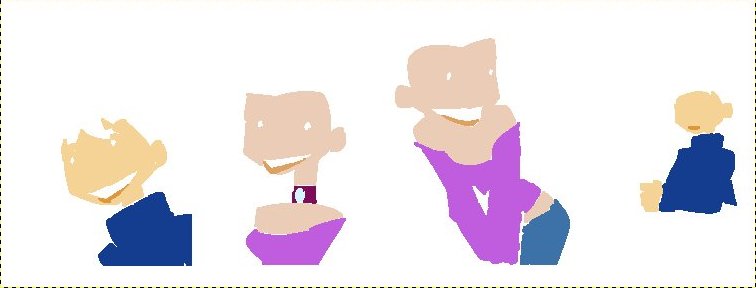
 Choose a layer, select that color again, and carefully paint in the
white areas as needed. Turn the Ink Layer on set the Opacity
slider to about 30%. The inks turn gray so you can see where
to
paint better. When it looks like this, you're done. (Wax On, Wax Off)
Choose a layer, select that color again, and carefully paint in the
white areas as needed. Turn the Ink Layer on set the Opacity
slider to about 30%. The inks turn gray so you can see where
to
paint better. When it looks like this, you're done. (Wax On, Wax Off)

When you're done (you are saving frequently, aren't you?) things will look about like this:
The Eyes
At this point, you're free to paint
in the eye white yourself, but I copied Hewolf's because I liked them.
You can skip the to the next section below on cleanup if you
want.
To make things simple, I dragged Hewolf's image onto my work file. Point to the layer in the source file and drag the layer into the image space of your file. The layer "Hewolf Color" is now on top of my work file layers!
Then use the Lasso tool to surround the eye (left), then Copy (Ctrl-C) and Paste (Ctrl-V) (middle). Note the "Floating Selection - Pasted Layer" on top of the layer stack. Hit the New Layer button to turn this into "Pasted Layer" and drag it down the stack just above EyesShelly (right).
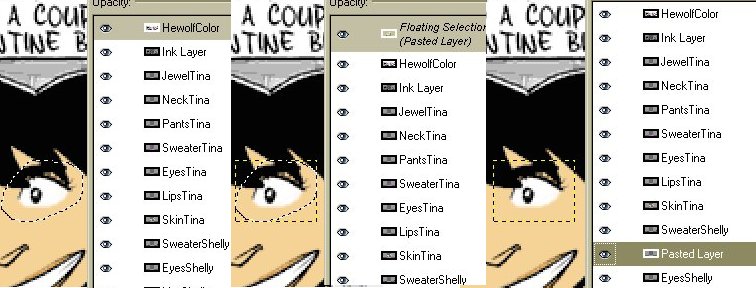
You can now turn off the Hewolf Color layer and set the Ink Layer to 50% opacity to check that the pasted eye is in the proper place -- move as needed. (If you want, you can use the Color Select tool and remove the black and skin tones leaving only the white.) Then you can Layer, Merge Down, to put your copied eye onto the EyesShelly layer. Repeat for the other eyes, and you're done! With the Ink Layer off, it will look like this. The lasso copied some of the hair as well, but that doesn't matter because it's all lined up in register with the ink layer.
To make things simple, I dragged Hewolf's image onto my work file. Point to the layer in the source file and drag the layer into the image space of your file. The layer "Hewolf Color" is now on top of my work file layers!
Then use the Lasso tool to surround the eye (left), then Copy (Ctrl-C) and Paste (Ctrl-V) (middle). Note the "Floating Selection - Pasted Layer" on top of the layer stack. Hit the New Layer button to turn this into "Pasted Layer" and drag it down the stack just above EyesShelly (right).
You can now turn off the Hewolf Color layer and set the Ink Layer to 50% opacity to check that the pasted eye is in the proper place -- move as needed. (If you want, you can use the Color Select tool and remove the black and skin tones leaving only the white.) Then you can Layer, Merge Down, to put your copied eye onto the EyesShelly layer. Repeat for the other eyes, and you're done! With the Ink Layer off, it will look like this. The lasso copied some of the hair as well, but that doesn't matter because it's all lined up in register with the ink layer.
Cleanup
 Remember
that awful green layer you made? Time to put it to use for a
Hole
Check! Turn on the Ink and other layers you might have turned
off, then turn on the Green. The bright green
should stand
out and reveal places where your color bucket fills or paint brushing
might have missed a spot along the edges of the Ink Layer Lines.
Remember
that awful green layer you made? Time to put it to use for a
Hole
Check! Turn on the Ink and other layers you might have turned
off, then turn on the Green. The bright green
should stand
out and reveal places where your color bucket fills or paint brushing
might have missed a spot along the edges of the Ink Layer Lines.
Note the mouth and hair shine along the top and left edges. You could fill them in with white (or whatever) but you don't have to. The white background will be seen through these holes.
Find anything else? Fix it and repeat!
Last, simplify your Layers stack. I saved the work so far and created a new file before continuing in case things really screwed up. Using the new file, I used Layer, Merge Down to collapse all the different layers into Eyes, Lips, Clothing, and Skin. Ink Layer remained on top, Original was unchanged (turned off), and the Green and Background (white) layers are on the bottom.
Now What?
At this point, you're done coloring
the
characters! Congratulations! Now, you can start
coloring
the backgrounds if you want, or.... you can try bringing out some
details using Shading and Highlights! Up for a challenge, are
you? Eh? Heheheheh.....
The Next Step -->
Shading and Highlights